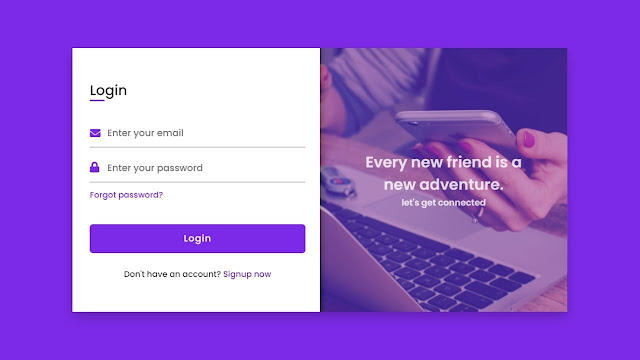
Hello friends, today we are going to learn How to Create a Responsive Login and Registration Form Template in HTML and CSS. There are a lot of Forms Design that I have created before but, to date, I have not created login and registration forms together or on one page.
What is the Login and Registration Form
Login Form means the login page or section where users need to enter their login details like email, phone number, and password. Registration form is the process to register user details to make login details for entry in the particular page or website.
In the login form section, we can make two input fields one is for the user email address or phone number and another for password and this is mandatory and in the registration form we have to add some extra input fields like the input field of name, phone number, password and other.
Let’s have a look at the image of the Login and Registration Form Template. There you can see only Login Form but when you click on the Signup now the right side image smoothly flips into the left side then the Signup form appears and Login Form Hides.
I have made this Responsive Login and Registration Form in HTML and CSS only and I have not used any single code of javascript for building this Login and Registration Form. I promise that you can easily understand all the HTML CSS code that I have used to make this Form.
To see the real example of this Login and Registration, please do watch the video tutorial of this design. After watching the tutorial you will definitely understand that how HTML and CSS code is working to make this Login and Registration Page Perfectly.
Login and Registration Form in HTML and CSS | Video Tutorial
You will get this Login and Registration Form Template Free, I have provided all HTML and CSS source code of this template below. Before jumping into the source code, you nee to know some important points of this project.
As you have seen on the video tutorial of Responsive Login and Registration Form in HTML CSS. At first, we could see only the Login Form and Registration Form had hidden behind the image. When I clicked on the Signup link, that image smoothly flip to the left direction, and the Registration Form appears and the Login Form disappears.
I have used HTML input’s checkbox to make the Signup and Login link clickable, you can do this by using JavaScript code but for this simple thing, I had gone for HTML’s Checkbox. To make this Login and Registration Form responsive I have used a CSS media query.
Now I believe, you can build and this Login and Registration Form easily but if you are feeling difficulty creating this Form, I have provided all source code of this Login and Registration Form below, from there you can copy or download it all source code files.
You May Like This:
Login & Registration Form Template | Source Code
For taking the source code of this Login and Registration Form Template first, you need to create two files one is an HTML file and another is a CSS file. After creating these two files then you can copy-paste the following source code. You can also directly download all source codes of this Login and Registration Form by clicking on the given download button.
<!DOCTYPE html>
<!-- Coding by CodingNepal | www.codingnepalweb.com-->
<html lang="en" dir="ltr">
  <head>
    <meta charset="UTF-8">
    <title> Login and Registration Form in HTML & CSS | CodingLab </title>
    <link rel="stylesheet" href="style.css">
    <!-- Fontawesome CDN Link -->
    <link rel="stylesheet" href="https://cdnjs.cloudflare.com/ajax/libs/font-awesome/5.15.3/css/all.min.css">
    <meta name="viewport" content="width=device-width, initial-scale=1.0">
   </head>
<body>
  <div class="container">
    <input type="checkbox" id="flip">
    <div class="cover">
      <div class="front">
        <img src="images/frontImg.jpg" alt="">
        <div class="text">
          <span class="text-1">Every new friend is a <br> new adventure</span>
          <span class="text-2">Let's get connected</span>
        </div>
      </div>
      <div class="back">
        <!--<img class="backImg" src="images/backImg.jpg" alt="">-->
        <div class="text">
          <span class="text-1">Complete miles of journey <br> with one step</span>
          <span class="text-2">Let's get started</span>
        </div>
      </div>
    </div>
    <div class="forms">
        <div class="form-content">
          <div class="login-form">
            <div class="title">Login</div>
          <form action="#">
            <div class="input-boxes">
              <div class="input-box">
                <i class="fas fa-envelope"></i>
                <input type="text" placeholder="Enter your email" required>
              </div>
              <div class="input-box">
                <i class="fas fa-lock"></i>
                <input type="password" placeholder="Enter your password" required>
              </div>
              <div class="text"><a href="#">Forgot password?</a></div>
              <div class="button input-box">
                <input type="submit" value="Sumbit">
              </div>
              <div class="text sign-up-text">Don't have an account? <label for="flip">Sigup now</label></div>
            </div>
        </form>
      </div>
        <div class="signup-form">
          <div class="title">Signup</div>
        <form action="#">
            <div class="input-boxes">
              <div class="input-box">
                <i class="fas fa-user"></i>
                <input type="text" placeholder="Enter your name" required>
              </div>
              <div class="input-box">
                <i class="fas fa-envelope"></i>
                <input type="text" placeholder="Enter your email" required>
              </div>
              <div class="input-box">
                <i class="fas fa-lock"></i>
                <input type="password" placeholder="Enter your password" required>
              </div>
              <div class="button input-box">
                <input type="submit" value="Sumbit">
              </div>
              <div class="text sign-up-text">Already have an account? <label for="flip">Login now</label></div>
            </div>
      </form>
    </div>
    </div>
    </div>
  </div>
</body>
</html>
/* Google Font Link */
@import url('https://fonts.googleapis.com/css2?family=Poppins:wght@200;300;400;500;600;700&display=swap');
*{
  margin: 0;
  padding: 0;
  box-sizing: border-box;
  font-family: "Poppins" , sans-serif;
}
body{
  min-height: 100vh;
  display: flex;
  align-items: center;
  justify-content: center;
  background: #7d2ae8;
  padding: 30px;
}
.container{
  position: relative;
  max-width: 850px;
  width: 100%;
  background: #fff;
  padding: 40px 30px;
  box-shadow: 0 5px 10px rgba(0,0,0,0.2);
  perspective: 2700px;
}
.container .cover{
  position: absolute;
  top: 0;
  left: 50%;
  height: 100%;
  width: 50%;
  z-index: 98;
  transition: all 1s ease;
  transform-origin: left;
  transform-style: preserve-3d;
}
.container #flip:checked ~ .cover{
  transform: rotateY(-180deg);
}
 .container .cover .front,
 .container .cover .back{
  position: absolute;
  top: 0;
  left: 0;
  height: 100%;
  width: 100%;
}
.cover .back{
  transform: rotateY(180deg);
  backface-visibility: hidden;
}
.container .cover::before,
.container .cover::after{
  content: '';
  position: absolute;
  height: 100%;
  width: 100%;
  background: #7d2ae8;
  opacity: 0.5;
  z-index: 12;
}
.container .cover::after{
  opacity: 0.3;
  transform: rotateY(180deg);
  backface-visibility: hidden;
}
.container .cover img{
  position: absolute;
  height: 100%;
  width: 100%;
  object-fit: cover;
  z-index: 10;
}
.container .cover .text{
  position: absolute;
  z-index: 130;
  height: 100%;
  width: 100%;
  display: flex;
  flex-direction: column;
  align-items: center;
  justify-content: center;
}
.cover .text .text-1,
.cover .text .text-2{
  font-size: 26px;
  font-weight: 600;
  color: #fff;
  text-align: center;
}
.cover .text .text-2{
  font-size: 15px;
  font-weight: 500;
}
.container .forms{
  height: 100%;
  width: 100%;
  background: #fff;
}
.container .form-content{
  display: flex;
  align-items: center;
  justify-content: space-between;
}
.form-content .login-form,
.form-content .signup-form{
  width: calc(100% / 2 - 25px);
}
.forms .form-content .title{
  position: relative;
  font-size: 24px;
  font-weight: 500;
  color: #333;
}
.forms .form-content .title:before{
  content: '';
  position: absolute;
  left: 0;
  bottom: 0;
  height: 3px;
  width: 25px;
  background: #7d2ae8;
}
.forms .signup-form  .title:before{
  width: 20px;
}
.forms .form-content .input-boxes{
  margin-top: 30px;
}
.forms .form-content .input-box{
  display: flex;
  align-items: center;
  height: 50px;
  width: 100%;
  margin: 10px 0;
  position: relative;
}
.form-content .input-box input{
  height: 100%;
  width: 100%;
  outline: none;
  border: none;
  padding: 0 30px;
  font-size: 16px;
  font-weight: 500;
  border-bottom: 2px solid rgba(0,0,0,0.2);
  transition: all 0.3s ease;
}
.form-content .input-box input:focus,
.form-content .input-box input:valid{
  border-color: #7d2ae8;
}
.form-content .input-box i{
  position: absolute;
  color: #7d2ae8;
  font-size: 17px;
}
.forms .form-content .text{
  font-size: 14px;
  font-weight: 500;
  color: #333;
}
.forms .form-content .text a{
  text-decoration: none;
}
.forms .form-content .text a:hover{
  text-decoration: underline;
}
.forms .form-content .button{
  color: #fff;
  margin-top: 40px;
}
.forms .form-content .button input{
  color: #fff;
  background: #7d2ae8;
  border-radius: 6px;
  padding: 0;
  cursor: pointer;
  transition: all 0.4s ease;
}
.forms .form-content .button input:hover{
  background: #5b13b9;
}
.forms .form-content label{
  color: #5b13b9;
  cursor: pointer;
}
.forms .form-content label:hover{
  text-decoration: underline;
}
.forms .form-content .login-text,
.forms .form-content .sign-up-text{
  text-align: center;
  margin-top: 25px;
}
.container #flip{
  display: none;
}
@media (max-width: 730px) {
  .container .cover{
    display: none;
  }
  .form-content .login-form,
  .form-content .signup-form{
    width: 100%;
  }
  .form-content .signup-form{
    display: none;
  }
  .container #flip:checked ~ .forms .signup-form{
    display: block;
  }
  .container #flip:checked ~ .forms .login-form{
    display: none;
  }
}
If you face any difficulties while creating your Responsive Login and Registration Form or your code is not working as expected, you can download the source code files for this Login and Signup Form for free by clicking on the download button, and you can also view a live demo of this card slider by clicking on the view live button.


