Hello readers, Today in this blog you’ll learn how to Send Mail using XAMPP Server. Earlier I have shared a blog on How to configure XAMPP to send Mail from Localhost in PHP? If you haven’t still read that blog, I want to suggest you read that blog first.
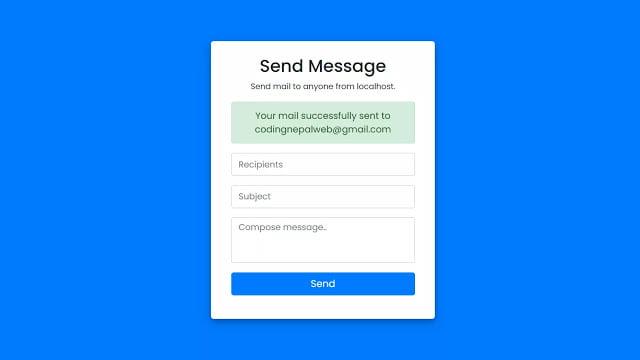
Generally, in this program, on the webpage, there is a mail send the form with three inputs – email address, subject, and message. When you click on the send button without filling the form completely, there is a display of an alert labeled as “All input fields are required!”. And when you filled up all inputs and click on the send button, your mail will be sent to a particular email address that you’ve provided in the recipient field and there is also display a success message labeled as “Your mail sent successfully to someone email”.
If somehow mail can’t be sent, there is a display of an alert labeled as “Sorry, failed while sending mail!”. If you’re feeling difficult to understand what I am saying. You can watch a full video tutorial on this program [How to Send Email with PHP & Gmail].
Video Tutorial of Send Mail using XAMPP Server
In the video, you have seen How to Send Email with PHP & Gmail and I hope you’ve understood the basic codes behind creating this form and sending mail. I used SMTP Server to send Mail/Email from Localhost using XAMPP. An SMTP (Simple Mail Transfer Protocol) server is an application that’s main purpose is to send and receive mail/email between email senders and receivers.
You might like this:
How to Send Email with PHP & Gmail [Source Codes]
To create this program [How to Send Email with PHP & Gmail]. First, you need to create two Files one PHP File and another one is CSS File. After creating these files just paste the following codes in your file.
First, create a PHP file with the name of mail.html and paste the given codes in your PHP file. Remember, you’ve to create a file with .php extension.
<!DOCTYPE html>
<!-- Created By CodingNepal -->
<html lang="en">
   <head>
      <meta charset="UTF-8">
      <title>Send Mail From Localhost | CodingNepal</title>
      <link rel="stylesheet" href="style.css">
      <!-- bootstrap cdn link -->
      <link rel="stylesheet" href="https://stackpath.bootstrapcdn.com/bootstrap/4.5.2/css/bootstrap.min.css">
   </head>
   <body>
      <div class="container">
         <div class="row">
            <div class="col-md-4 offset-md-4 mail-form">
               <h2 class="text-center">
                  Send Message
               </h2>
               <p class="text-center">
                  Send mail to anyone from localhost.
               </p>
               <!-- starting php code -->
               <?php
                  //first we leave this input field blank
                  $recipient = "";
                  //if user click the send button
                  if(isset($_POST['send'])){
                      //access user entered data
                     $recipient = $_POST['email'];
                     $subject = $_POST['subject'];
                     $message = $_POST['message'];
                     $sender = "From: shahiprem7890@gmail.com";
                     //if user leave empty field among one of them
                     if(empty($recipient) || empty($subject) || empty($message)){
                         ?>
               <!-- display an alert message if one of them field is empty -->
               <div class="alert alert-danger text-center">
                  <?php echo "All inputs are required!" ?>
               </div>
               <?php
                  }else{
                      // PHP function to send mail
                     if(mail($recipient, $subject, $message, $sender)){
                      ?>
               <!-- display a success message if once mail sent sucessfully -->
               <div class="alert alert-success text-center">
                  <?php echo "Your mail successfully sent to $recipient"?>
               </div>
               <?php
                  $recipient = "";
                  }else{
                   ?>
               <!-- display an alert message if somehow mail can't be sent -->
               <div class="alert alert-danger text-center">
                  <?php echo "Failed while sending your mail!" ?>
               </div>
               <?php
                  }
                  }
                  }
                  ?> <!-- end of php code -->
               <form action="mail.php" method="POST">
                  <div class="form-group">
                     <input class="form-control" name="email" type="email" placeholder="Recipients" value="<?php echo $recipient ?>">
                  </div>
                  <div class="form-group">
                     <input class="form-control" name="subject" type="text" placeholder="Subject">
                  </div>
                  <div class="form-group">
                     <!-- change this tag name into textarea to show textarea field. Due to more textarea I got an error, so I change the name of this field -->
                     <!-- <changeit cols="30" rows="5" class="form-control textarea" name="message" placeholder="Compose your message.."></changeit> -->
                  </div>
                  <div class="form-group">
                     <input class="form-control button btn-primary" type="submit" name="send" value="Send" placeholder="Subject">
                  </div>
               </form>
            </div>
         </div>
      </div>
   </body>
</html>
Second, create a CSS file with the name of style.css and paste the given codes in your CSS file. Remember, you’ve to create a file with .css extension.
/* custom css styling */
@import url('https://fonts.googleapis.com/css?family=Poppins:400,500,600,700&display=swap');
html,body{
    background: #007bff;
}
::selection{
    color: #fff;
    background: #007bff;
}
.container{
    position: absolute;
    top: 50%;
    left: 50%;
    transform: translate(-50%, -50%);
    font-family: 'Poppins', sans-serif;
}
.container .mail-form{
    background: #fff;
    padding: 25px 35px;
    border-radius: 5px;
    box-shadow: 0 4px 8px 0 rgba(0, 0, 0, 0.2),
                0 6px 20px 0 rgba(0, 0, 0, 0.19);
}
.container form .form-control{
    height: 43px;
    font-size: 15px;
}
.container .mail-form form .form-group .button{
    font-size: 17px!important;
}
.container form .textarea{
    height: 100px;
    resize: none;
}
.container .mail-form h2{
    font-size: 30px;
    font-weight: 600;
}
.container .mail-form p{
    font-size: 14px;
}
That’s all, now you’ve successfully created a How to Send Mail using XAMPP Server with PHP. If your code doesn’t work or you’ve faced any errors/problems then please download the source code files from the given download button. It’s free and a .zip file will be downloaded and you’ve extracted it.


