Hey friends, today in this blog, you’ll learn how to create an Add Tags Input Box in HTML CSS & JavaScript. In the earlier blog, I have shared how to create a Draggable Div Element in JavaScript, and now it’s time to create Tags Input.
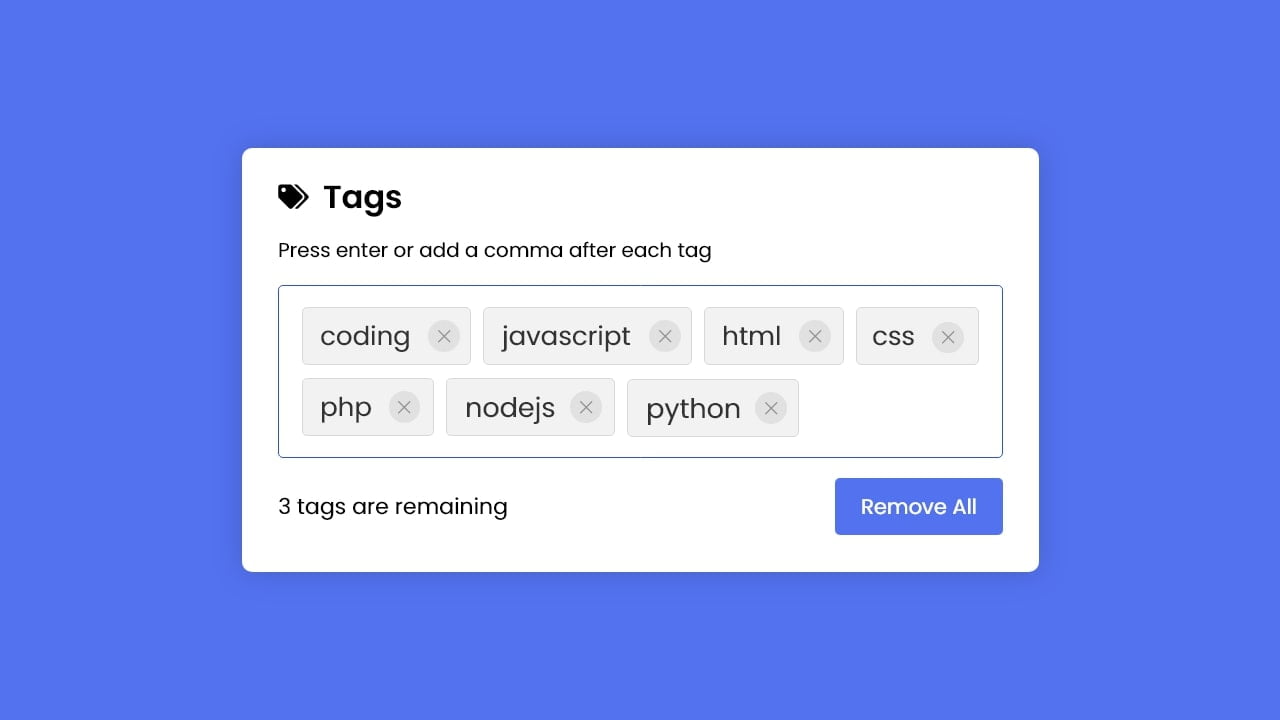
A tags input is a user interface (UI) component that allows the user to add or insert multiple entries as tags into an input field. In this project (Tags Input in JavaScript), as you can see on the webpage, there is an input box with some tags, button, and tags counter.
You can remove each tag by clicking on a close icon or remove all tags at once by clicking on the Remove All button. You can insert a maximum of 10 tags only and duplicate tags won’t be added in the input field.
If you’re feeling difficulty with what I’m saying then you can watch a demo or full video tutorial of this tags input.
Video Tutorial of Tags Input Box in HTML & JavaScript
In the video, you have seen the demo of this tags input and how I created it using HTML CSS & Pure JavaScript. If you’re too beginner and don’t have basic knowledge of JavaScript then you may have difficulties to understand the codes.
You can build this same input tag box using JavaScript libraries in 4 to 5 lines of code, but if you’re making this tag input for learning and expand your JavaScript knowledge then you shouldn’t use JavaScript libraries.
I believe you understood the codes and liked this project too. If you liked this video and want source codes then you can easily get source codes and files of this tags input from the bottom of this page.
You might like this:
- Detect AdBlocker using JavaScript
- Draggable Div Element in JavaScript
- Create Custom Captcha in JavaScript
- Currency Converter App in JavaScript
Tags Input Box in JavaScript [Source Codes]
To create Tags Input in HTML CSS & JavaScript. First, you need to create three Files: HTML, CSS & JavaScript files. After creating these files just paste the following codes into your file. You can also download the source code files of this Tags Input project from the given download button.
First, create an HTML file with the name of index.html and paste the given codes into your HTML file. Remember, you’ve to create a file with .html extension.
<!DOCTYPE html>
<!-- Coding By CodingNepal - youtube.com/codingnepal -->
<html lang="en" dir="ltr">
  <head>
    <meta charset="utf-8">
    <title>Add Tags Input Box | CodingNepal</title>
    <link rel="stylesheet" href="style.css">
    <meta name="viewport" content="width=device-width, initial-scale=1.0">
    <!-- Unicons CDN Link for Icons -->
    <link rel="stylesheet" href="https://unicons.iconscout.com/release/v4.0.0/css/thinline.css">
  </head>
  <body>
    <div class="wrapper">
      <div class="title">
        <img src="tag.svg" alt="icon">
        <h2>Tags</h2>
      </div>
      <div class="content">
        <p>Press enter or add a comma after each tag</p>
        <ul><input type="text" spellcheck="false"></ul>
      </div>
      <div class="details">
        <p><span>10</span> tags are remaining</p>
        <button>Remove All</button>
      </div>
    </div>
    <script src="script.js"></script>
  </body>
</html>
Second, create a CSS file with the name of style.css and paste the given codes in your CSS file. Remember, you’ve to create a file with .css extension.
/* Import Google Font - Poppins */
@import url('https://fonts.googleapis.com/css2?family=Poppins:wght@400;500;600;700&display=swap');
*{
  margin: 0;
  padding: 0;
  box-sizing: border-box;
  font-family: 'Poppins', sans-serif;
}
body{
  display: flex;
  align-items: center;
  justify-content: center;
  min-height: 100vh;
  background: #5372F0;
}
::selection{
  color: #fff;
  background: #5372F0;
}
.wrapper{
  width: 496px;
  background: #fff;
  border-radius: 10px;
  padding: 18px 25px 20px;
  box-shadow: 0 0 30px rgba(0,0,0,0.06);
}
.wrapper :where(.title, li, li i, .details){
  display: flex;
  align-items: center;
}
.title img{
  max-width: 21px;
}
.title h2{
  font-size: 21px;
  font-weight: 600;
  margin-left: 8px;
}
.wrapper .content{
  margin: 10px 0;
}
.content p{
  font-size: 15px;
}
.content ul{
  display: flex;
  flex-wrap: wrap;
  padding: 7px;
  margin: 12px 0;
  border-radius: 5px;
  border: 1px solid #a6a6a6;
}
.content ul  li{
  color: #333;
  margin: 4px 3px;
  list-style: none;
  border-radius: 5px;
  background: #F2F2F2;
  padding: 5px 8px 5px 10px;
  border: 1px solid #e3e1e1;
}
.content ul li i{
  height: 20px;
  width: 20px;
  color: #808080;
  margin-left: 8px;
  font-size: 12px;
  cursor: pointer;
  border-radius: 50%;
  background: #dfdfdf;
  justify-content: center;
}
.content ul input{
  flex: 1;
  padding: 5px;
  border: none;
  outline: none;
  font-size: 16px;
}
.wrapper .details{
  justify-content: space-between;
}
.details button{
  border: none;
  outline: none;
  color: #fff;
  font-size: 14px;
  cursor: pointer;
  padding: 9px 15px;
  border-radius: 5px;
  background: #5372F0;
  transition: background 0.3s ease;
}
.details button:hover{
  background: #2c52ed;
}
Last, create a JavaScript file with the name of script.js and paste the given codes in your JavaScript file. Remember, you’ve to create a file with .js extension.
const ul = document.querySelector("ul"),
input = document.querySelector("input"),
tagNumb = document.querySelector(".details span");

let maxTags = 10,
tags = ["coding", "nepal"];

countTags();
createTag();

function countTags(){
    input.focus();
    tagNumb.innerText = maxTags - tags.length;
}

function createTag(){
    ul.querySelectorAll("li").forEach(li => li.remove());
    tags.slice().reverse().forEach(tag =>{
        let liTag = `<li>${tag} <i class="uit uit-multiply" onclick="remove(this, '${tag}')"></i></li>`;
        ul.insertAdjacentHTML("afterbegin", liTag);
    });
    countTags();
}

function remove(element, tag){
    let index  = tags.indexOf(tag);
    tags = [...tags.slice(0, index), ...tags.slice(index + 1)];
    element.parentElement.remove();
    countTags();
}

function addTag(e){
    if(e.key == "Enter"){
        let tag = e.target.value.replace(/\s+/g, ' ');
        if(tag.length > 1 && !tags.includes(tag)){
            if(tags.length < 10){
                tag.split(',').forEach(tag => {
                    tags.push(tag);
                    createTag();
                });
            }
        }
        e.target.value = "";
    }
}

input.addEventListener("keyup", addTag);

const removeBtn = document.querySelector(".details button");
removeBtn.addEventListener("click", () =>{
    tags.length = 0;
    ul.querySelectorAll("li").forEach(li => li.remove());
    countTags();
});
That’s all, now you’ve successfully created an Add Tags Input Box in HTML CSS & JavaScript. If your code doesn’t work or you’ve faced any error/problem, please download the source code files from the given download button. It’s free and a .zip file will be downloaded then you’ve to extract it.


