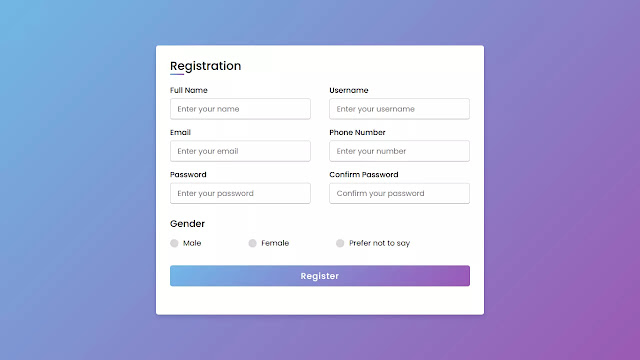
Hello Reader, today in this blog you will learn to create a Responsive Registration Form in HTML and CSS, you can also call it the Signup form. You can also check out the 16 Login & Registration Forms I have created to date. Now I’m going to build a registration/signup form.
The registration/signup form contains various input fields of different input details where the user needs to fill in his/her details to submit for a particular web page. There are various types of registration but the main purpose of this type of form is to collect users’ information or details.
As you can see on the given image of the signup of the registration form. Normally you can add 6 to 10 input fields on the signup form. Many people are confused about what they should include in the signup or registration form. You can add the following elements to your signup or registration form.
- Company Logo
- First and last name
- User name or Email
- Phone number
- Country/ Region/ State
- Date and Time
- Gender Selection
- Signup Button
If you want to see all the animation and the responsive programming, then you have to watch full video tutorials of this program Responsive Registration Form in HTML and CSS, after watching this video you will get all codes behind this programming and you will learn the actual works of every code.
Registration Form in HTML and CSS | Video Tutorial
You can get this Signup or Registration Form Template free, I have provided all the HTML and CSS code that I have used to create this template. You can take all the source code from below. Before jumping into the source code file you need to know some importance of this project.
As you have seen in the full video tutorial of the responsive registration form in HTML and CSS. I have added important elements which are essential for the registration form. You have also seen HTML and CSS code for this type of registration form.
To make this registration form responsive I have used a CSS media query. Also, you have seen how to make a custom radio button and input field of input box animation.
If you are familiar with HTML and CSS, you can easily make this Responsive Registration Form. If you have basic knowledge of JavaScript then you can add more functions to this registration form.
Those friends who are feeling difficulties building this registration form or page, don’t worry I have provided free HTML and CSS source code files of this Responsive Registration Form below:
You Might Like This:
- Animated Login Form HTML & CSS
- Login Form with Social Media Icons
- Login Form with Floating Label Animation
- Profile Card Design with Social Media Icons
Registration Form | Sign-up form | Source Code
To copy-paste the given codes of this Registration/Signup Form Design Template, you need to create two files one HTML file and another one a CSS file, after creating ing these two files you simply copy-paste all the given codes of HTML & CSS. You can also download all source code files from the given download button.
Create an HTML file on your computer with the name index.html and copy-paste the given HTML code of the Registration Form into your document.
<!DOCTYPE html>
<!-- Created By CodingLab - www.codinglabweb.com -->
<html lang="en" dir="ltr">
  <head>
    <meta charset="UTF-8">
    <title> Responsive Registration Form | CodingLab </title>
    <link rel="stylesheet" href="style.css">
     <meta name="viewport" content="width=device-width, initial-scale=1.0">
   </head>
<body>
  <div class="container">
    <div class="title">Registration</div>
    <div class="content">
      <form action="#">
        <div class="user-details">
          <div class="input-box">
            <span class="details">Full Name</span>
            <input type="text" placeholder="Enter your name" required>
          </div>
          <div class="input-box">
            <span class="details">Username</span>
            <input type="text" placeholder="Enter your username" required>
          </div>
          <div class="input-box">
            <span class="details">Email</span>
            <input type="text" placeholder="Enter your email" required>
          </div>
          <div class="input-box">
            <span class="details">Phone Number</span>
            <input type="text" placeholder="Enter your number" required>
          </div>
          <div class="input-box">
            <span class="details">Password</span>
            <input type="text" placeholder="Enter your password" required>
          </div>
          <div class="input-box">
            <span class="details">Confirm Password</span>
            <input type="text" placeholder="Confirm your password" required>
          </div>
        </div>
        <div class="gender-details">
          <input type="radio" name="gender" id="dot-1">
          <input type="radio" name="gender" id="dot-2">
          <input type="radio" name="gender" id="dot-3">
          <span class="gender-title">Gender</span>
          <div class="category">
            <label for="dot-1">
            <span class="dot one"></span>
            <span class="gender">Male</span>
          </label>
          <label for="dot-2">
            <span class="dot two"></span>
            <span class="gender">Female</span>
          </label>
          <label for="dot-3">
            <span class="dot three"></span>
            <span class="gender">Prefer not to say</span>
            </label>
          </div>
        </div>
        <div class="button">
          <input type="submit" value="Register">
        </div>
      </form>
    </div>
  </div>

</body>
</html>
Create a CSS file on your computer with the name style.css and copy-paste the following CSS code of this Registration Form into your document. Remember that the HTML file and CSS file must be in the same folder.
@import url('https://fonts.googleapis.com/css2?family=Poppins:wght@200;300;400;500;600;700&display=swap');
*{
  margin: 0;
  padding: 0;
  box-sizing: border-box;
  font-family: 'Poppins',sans-serif;
}
body{
  height: 100vh;
  display: flex;
  justify-content: center;
  align-items: center;
  padding: 10px;
  background: linear-gradient(135deg, #71b7e6, #9b59b6);
}
.container{
  max-width: 700px;
  width: 100%;
  background-color: #fff;
  padding: 25px 30px;
  border-radius: 5px;
  box-shadow: 0 5px 10px rgba(0,0,0,0.15);
}
.container .title{
  font-size: 25px;
  font-weight: 500;
  position: relative;
}
.container .title::before{
  content: "";
  position: absolute;
  left: 0;
  bottom: 0;
  height: 3px;
  width: 30px;
  border-radius: 5px;
  background: linear-gradient(135deg, #71b7e6, #9b59b6);
}
.content form .user-details{
  display: flex;
  flex-wrap: wrap;
  justify-content: space-between;
  margin: 20px 0 12px 0;
}
form .user-details .input-box{
  margin-bottom: 15px;
  width: calc(100% / 2 - 20px);
}
form .input-box span.details{
  display: block;
  font-weight: 500;
  margin-bottom: 5px;
}
.user-details .input-box input{
  height: 45px;
  width: 100%;
  outline: none;
  font-size: 16px;
  border-radius: 5px;
  padding-left: 15px;
  border: 1px solid #ccc;
  border-bottom-width: 2px;
  transition: all 0.3s ease;
}
.user-details .input-box input:focus,
.user-details .input-box input:valid{
  border-color: #9b59b6;
}
 form .gender-details .gender-title{
  font-size: 20px;
  font-weight: 500;
 }
 form .category{
   display: flex;
   width: 80%;
   margin: 14px 0 ;
   justify-content: space-between;
 }
 form .category label{
   display: flex;
   align-items: center;
   cursor: pointer;
 }
 form .category label .dot{
  height: 18px;
  width: 18px;
  border-radius: 50%;
  margin-right: 10px;
  background: #d9d9d9;
  border: 5px solid transparent;
  transition: all 0.3s ease;
}
 #dot-1:checked ~ .category label .one,
 #dot-2:checked ~ .category label .two,
 #dot-3:checked ~ .category label .three{
   background: #9b59b6;
   border-color: #d9d9d9;
 }
 form input[type="radio"]{
   display: none;
 }
 form .button{
   height: 45px;
   margin: 35px 0
 }
 form .button input{
   height: 100%;
   width: 100%;
   border-radius: 5px;
   border: none;
   color: #fff;
   font-size: 18px;
   font-weight: 500;
   letter-spacing: 1px;
   cursor: pointer;
   transition: all 0.3s ease;
   background: linear-gradient(135deg, #71b7e6, #9b59b6);
 }
 form .button input:hover{
  /* transform: scale(0.99); */
  background: linear-gradient(-135deg, #71b7e6, #9b59b6);
  }
 @media(max-width: 584px){
 .container{
  max-width: 100%;
}
form .user-details .input-box{
    margin-bottom: 15px;
    width: 100%;
  }
  form .category{
    width: 100%;
  }
  .content form .user-details{
    max-height: 300px;
    overflow-y: scroll;
  }
  .user-details::-webkit-scrollbar{
    width: 5px;
  }
  }
  @media(max-width: 459px){
  .container .content .category{
    flex-direction: column;
  }
}
If you face any difficulties while creating your Responsive Registration Form or your code is not working as expected, you can download the source code files for this Signup Form for free by clicking on the download button, and you can also view a live demo of this card slider by clicking on the view live button.


