Hello readers, Today in this blog you’ll learn how to create a Simple Chatbot using PHP with MySQL & jQuery (Ajax). Earlier I shared a blog on how to Send Emails with PHP from Localhost using the XAMPP server and now it’s time to create a working chatbot in PHP.
A chatbot is a computer program designed to simulate human conversation. These chatbots reply to you instantly according to your queries because programmers have inserted thousands of inputs, replies, and queries into the database that can be asked by the user.
To make an advanced chatbot we’ve to code more and more but I tried to make a simple chatbot with a few lines of code and queries which help you to get an idea about how a chatbot actually works.
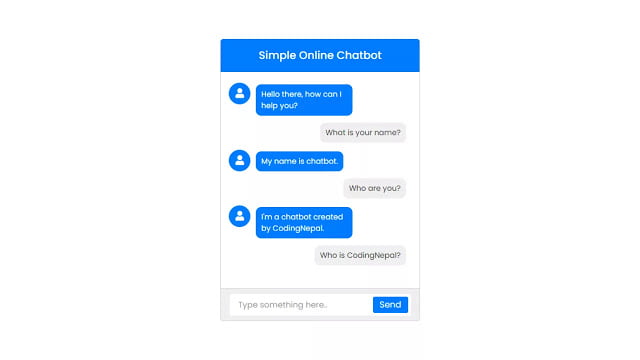
On the webpage for this chatbot, there is a chat form with an input field and a button labeled “send” for typing a message and sending it to the bot. If you ask the bot a question, and if the query exists in the database, the bot instantly replies with a message based on your query; if the query does not match any database queries, the bot replies with a message labeled “Sorry, we can’t understand you!”
In this chatting process, the webpage isn’t reloaded because I used jQuery (Ajax) for that. If you’re feeling difficult to understand what I am saying. You can watch a full video tutorial on this program [Simple Chatbot using PHP].
Video Tutorial of Simple Chatbot using PHP
In the video, you have seen how this chatbot looks and how it gives a reply according to the user query. If you know basic HTML, CSS, PHP & jQuery then you can easily understand the codes behind creating this chatbot. In this video, I have just made a chatbot form where chats are static but in part -2 of this video, I have done the PHP and jQuery codes of this program and made it dynamic.
In that part -2 video, to make this chatbot dynamic, I just created a database and a table in MySQL and inserted some queries and replies into it and with the help of PHP and Ajax, I retrieved the data (replies) in the chat form according to the user query.
You might like this:
Simple Chatbot using PHP with MySQL [Source Codes]
To create this program [Simple Chatbot using PHP]. First, you need to create three Files two PHP Files and another one CSS Files. After creating these files just paste the following codes in your file.
Remember that, if you’re going to download code files, you’ve to create a database name “bot”, and table name “chatbot”, and inside this table, you’ve to create three rows (id, queries, replies). Otherwise, you can replace the name of the database, table, and table rows with your database table details in my given files.
- id type int(11) auto_increment
- queries type varchar(300)
- replies type varchar(300)
First, create a PHP file with the name bot.php and paste the given codes into your PHP file. Remember, you’ve to create a file with .php extension.
<!-- Created By CodingNepal -->
<!DOCTYPE html>
<html lang="en">
<head>
    <meta charset="UTF-8">
    <meta name="viewport" content="width=device-width, initial-scale=1.0">
    <title>Simple Chatbot in PHP | CodingNepal</title>
    <link rel="stylesheet" href="style.css">
    <link rel="stylesheet" href="https://cdnjs.cloudflare.com/ajax/libs/font-awesome/5.15.3/css/all.min.css"/>
    <script src="https://code.jquery.com/jquery-3.5.1.min.js"></script>
</head>
<body>
    <div class="wrapper">
        <div class="title">Simple Online Chatbot</div>
        <div class="form">
            <div class="bot-inbox inbox">
                <div class="icon">
                    <i class="fas fa-user"></i>
                </div>
                <div class="msg-header">
                    <p>Hello there, how can I help you?</p>
                </div>
            </div>
        </div>
        <div class="typing-field">
            <div class="input-data">
                <input id="data" type="text" placeholder="Type something here.." required>
                <button id="send-btn">Send</button>
            </div>
        </div>
    </div>

    <script>
        $(document).ready(function(){
            $("#send-btn").on("click", function(){
                $value = $("#data").val();
                $msg = '<div class="user-inbox inbox"><div class="msg-header"><p>'+ $value +'</p></div></div>';
                $(".form").append($msg);
                $("#data").val('');

                // start ajax code
                $.ajax({
                    url: 'message.php',
                    type: 'POST',
                    data: 'text='+$value,
                    success: function(result){
                        $replay = '<div class="bot-inbox inbox"><div class="icon"><i class="fas fa-user"></i></div><div class="msg-header"><p>'+ result +'</p></div></div>';
                        $(".form").append($replay);
                        // when chat goes down the scroll bar automatically comes to the bottom
                        $(".form").scrollTop($(".form")[0].scrollHeight);
                    }
                });
            });
        });
    </script>

</body>
</html>
Second, create a CSS file with the name of style.css and paste the given codes in your CSS file. Remember, you’ve to create a file with .css extension.
@import url('https://fonts.googleapis.com/css2?family=Poppins:wght@200;300;400;500;600;700&display=swap');
*{
    margin: 0;
    padding: 0;
    box-sizing: border-box;
    font-family: 'Poppins', sans-serif;
}
html,body{
    display: grid;
    height: 100%;
    place-items: center;
}

::selection{
    color: #fff;
    background: #007bff;
}

::-webkit-scrollbar{
    width: 3px;
    border-radius: 25px;
}
::-webkit-scrollbar-track{
    background: #f1f1f1;
}
::-webkit-scrollbar-thumb{
    background: #ddd;
}
::-webkit-scrollbar-thumb:hover{
    background: #ccc;
}

.wrapper{
    width: 370px;
    background: #fff;
    border-radius: 5px;
    border: 1px solid lightgrey;
    border-top: 0px;
}
.wrapper .title{
    background: #007bff;
    color: #fff;
    font-size: 20px;
    font-weight: 500;
    line-height: 60px;
    text-align: center;
    border-bottom: 1px solid #006fe6;
    border-radius: 5px 5px 0 0;
}
.wrapper .form{
    padding: 20px 15px;
    min-height: 400px;
    max-height: 400px;
    overflow-y: auto;
}
.wrapper .form .inbox{
    width: 100%;
    display: flex;
    align-items: baseline;
}
.wrapper .form .user-inbox{
    justify-content: flex-end;
    margin: 13px 0;
}
.wrapper .form .inbox .icon{
    height: 40px;
    width: 40px;
    color: #fff;
    text-align: center;
    line-height: 40px;
    border-radius: 50%;
    font-size: 18px;
    background: #007bff;
}
.wrapper .form .inbox .msg-header{
    max-width: 53%;
    margin-left: 10px;
}
.form .inbox .msg-header p{
    color: #fff;
    background: #007bff;
    border-radius: 10px;
    padding: 8px 10px;
    font-size: 14px;
    word-break: break-all;
}
.form .user-inbox .msg-header p{
    color: #333;
    background: #efefef;
}
.wrapper .typing-field{
    display: flex;
    height: 60px;
    width: 100%;
    align-items: center;
    justify-content: space-evenly;
    background: #efefef;
    border-top: 1px solid #d9d9d9;
    border-radius: 0 0 5px 5px;
}
.wrapper .typing-field .input-data{
    height: 40px;
    width: 335px;
    position: relative;
}
.wrapper .typing-field .input-data input{
    height: 100%;
    width: 100%;
    outline: none;
    border: 1px solid transparent;
    padding: 0 80px 0 15px;
    border-radius: 3px;
    font-size: 15px;
    background: #fff;
    transition: all 0.3s ease;
}
.typing-field .input-data input:focus{
    border-color: rgba(0,123,255,0.8);
}
.input-data input::placeholder{
    color: #999999;
    transition: all 0.3s ease;
}
.input-data input:focus::placeholder{
    color: #bfbfbf;
}
.wrapper .typing-field .input-data button{
    position: absolute;
    right: 5px;
    top: 50%;
    height: 30px;
    width: 65px;
    color: #fff;
    font-size: 16px;
    cursor: pointer;
    outline: none;
    opacity: 0;
    pointer-events: none;
    border-radius: 3px;
    background: #007bff;
    border: 1px solid #007bff;
    transform: translateY(-50%);
    transition: all 0.3s ease;
}
.wrapper .typing-field .input-data input:valid ~ button{
    opacity: 1;
    pointer-events: auto;
}
.typing-field .input-data button:hover{
    background: #006fef;
}
Last, create a PHP file with the name message.php and paste the given codes into your PHP file. Remember, you’ve to create a file with .php extension.
<!-- Created By CodingNepal -->
<?php
// connecting to database
$conn = mysqli_connect("localhost", "root", "", "bot") or die("Database Error");

// getting user message through ajax
$getMesg = mysqli_real_escape_string($conn, $_POST['text']);

//checking user query to database query
$check_data = "SELECT replies FROM chatbot WHERE queries LIKE '%$getMesg%'";
$run_query = mysqli_query($conn, $check_data) or die("Error");

// if user query matched to database query we'll show the reply otherwise it go to else statement
if(mysqli_num_rows($run_query) > 0){
    //fetching replay from the database according to the user query
    $fetch_data = mysqli_fetch_assoc($run_query);
    //storing replay to a varible which we'll send to ajax
    $replay = $fetch_data['replies'];
    echo $replay;
}else{
    echo "Sorry can't be able to understand you!";
}

?>
That’s all, now you’ve successfully created a Simple Chatbot using PHP with MySQL & jQuery (Ajax). If your code doesn’t work or you’ve faced any error/problem then please download the source code files from the given download button. It’s free and a .zip file will be downloaded then you’ve to extract it.


