Hey friends, today in this blog you’ll learn how to do Email Validation in HTML CSS & JavaScript. Earlier I have shared many Login Form Designs but there are no features of the Email Validation. So, it’s time to do Simple Email Validation in HTML & JavaScript.
Email Validation is a method that verifies if the user entered email address is valid or not. If an email is not valid then we can show an error message to inform the user about it.
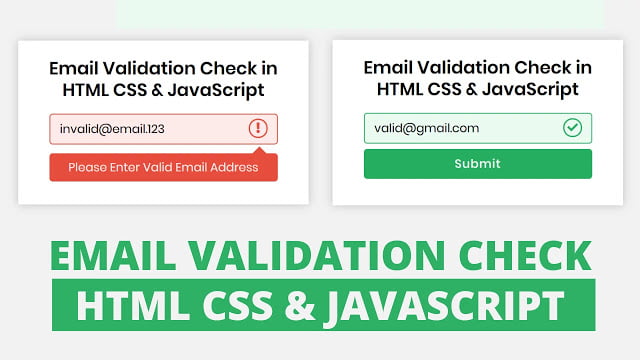
In this small project (Email Validation in HTML), as you can in the image preview, there are two boxes with input. In the first box input, I have entered an invalid email address so there is shown a tooltip with an error message and in the second box input, I have entered a valid email address so there is shown the submit button with the green background.
You may know, the red color indicates an error and the green color indicates success. So I used these colors to inform the user about their entered email. You can also watch a demo video or tutorial of this Email Validation in HTML.
Video Tutorial of Email Validation in HTML
In the video, you have seen the demo of this Email Validation in HTML & JavaScript and also how I did validation using only HTML CSS & JavaScript. To validate the user-entered email address first I written a regex pattern for validation and match the user entered inputs with this pattern.
If the user entered email address is matched with the given pattern that means the user has entered a valid email else entered email is not valid. I hope you like this Email Validation in HTML CSS & JavaScript and want to get the source codes of this small project. But don’t worry I have given all codes to the bottom of this page and you can copy-paste.
You might like this:
- Password Strength Check in JavaScript
- Password Show Hide Toggle in JavaScript
- Random Password Generator in JavaScript
- Confirm Password Validation in JavaScript
Email Validation in HTML & JavaScript [Source Codes]
To create this Email Validation in HTML CSS & JavaScript. First, you need to create two Files: HTML and CSS File. After creating these files just paste the following codes in your file. You may have questions about why you don’t need to create a JavaScript file right? Well, I’ve written all JavaScript codes inside an HTML file so you have to paste all JS codes inside <script>…JS Codes…</script> tag.
First, create an HTML file with the name of index.html and paste the given codes in your HTML file. Remember, you’ve to create a file with .html extension.
<!DOCTYPE html>
<!-- Created By CodingNepal -->
<html lang="en" dir="ltr">
   <head>
      <meta charset="utf-8">
      <title>Email Validation in HTML & JavaScript | CodingNepal</title>
      <link rel="stylesheet" href="style.css">
      <link rel="stylesheet" href="https://cdnjs.cloudflare.com/ajax/libs/font-awesome/5.15.3/css/all.min.css"/>
   </head>
   <body>
      <div class="content">
         <header>Email Validation Check in HTML CSS & JavaScript</header>
         <form action="#">
            <div class="field">
               <input onkeyup="check()" id="email" type="text" autocomplete="off" placeholder="Enter Email Address">
               <div class="icons">
                  <span class="icon1 fas fa-exclamation"></span>
                  <span class="icon2 fas fa-check"></span>
               </div>
            </div>
            <div class="error-text">
               Please Enter Valid Email Address
            </div>
            <button>Submit</button>
         </form>
      </div>
      <script>
         const email = document.querySelector("#email");
         const icon1 = document.querySelector(".icon1");
         const icon2 = document.querySelector(".icon2");
         const error = document.querySelector(".error-text");
         const btn = document.querySelector("button");
         let regExp = /^[^ ]+@[^ ]+\.[a-z]{2,3}$/;
         function check(){
           if(email.value.match(regExp)){
             email.style.borderColor = "#27ae60";
             email.style.background = "#eafaf1";
             icon1.style.display = "none";
             icon2.style.display = "block";
             error.style.display = "none";
             btn.style.display = "block";
           }else{
             email.style.borderColor = "#e74c3c";
             email.style.background = "#fceae9";
             icon1.style.display = "block";
             icon2.style.display = "none";
             error.style.display = "block";
             btn.style.display = "none";
           }
           if(email.value == ""){
             email.style.borderColor = "lightgrey";
             email.style.background = "#fff";
             icon1.style.display = "none";
             icon2.style.display = "none";
             error.style.display = "none";
             btn.style.display = "none";
           }
         }
      </script>
   </body>
</html>
Second, create a CSS file with the name of style.css and paste the given codes in your CSS file. Remember, you’ve to create a file with .css extension.
@import url('https://fonts.googleapis.com/css?family=Poppins:400,500,600,700&display=swap');
*{
  margin: 0;
  padding: 0;
  font-family: 'Poppins', sans-serif;
}
html,body{
  display: grid;
  height: 100%;
  place-items: center;
  background: #f2f2f2
}
.content{
  max-width: 400px;
  padding: 20px;
  background: #fff;
  text-align: center;
  box-shadow: 0px 0px 15px rgba(0,0,0,0.2);
}
.content header{
  padding-top: 5px;
  font-size: 27px;
  font-weight: 600;
  line-height: 33px;
}
.content form{
  margin: 20px 27px;
}
.content form .field{
  width: 100%;
  height: 45px;
  display: flex;
  position: relative;
}
form .field input{
  width: 100%;
  height: 100%;
  border: 1px solid lightgrey;
  border-radius: 5px;
  padding-left: 15px;
  font-size: 18px;
  outline: none;
}
form .field .icons{
  position: absolute;
  right: 15px;
  top: 50%;
  transform: translateY(-50%);
}
.field .icons span{
  height: 25px;
  width: 25px;
  border: 2px solid;
  border-radius: 50%;
  line-height: 25px;
  display: none;
}
.field .icons span.icon1{
  color: #e74c3c;
  border-color: #e74c3c;
}
.field .icons span.icon2{
  color: #27ae60;
  border-color: #27ae60;
}
form .error-text{
  position: relative;
  margin: 15px 0 -5px 0;
  background: #e74c3c;
  color: #fceae8;
  font-size: 18px;
  padding: 8px;
  border-radius: 5px;
  user-select: none;
  display: none;
}
form .error-text:before{
  position: absolute;
  content: '';
  height: 15px;
  width: 15px;
  background: #e74c3c;
  right: 20px;
  top: -7px;
  transform: rotate(45deg);
}
form button{
  margin-top: 10px;
  width: 100%;
  height: 45px;
  border: none;
  outline: none;
  border-radius: 5px;
  background: #27ae60;
  color: #f2f2f2;
  font-size: 18px;
  font-weight: 500;
  letter-spacing: 1px;
  cursor: pointer;
  display: none;
  transition: 0.3s;
}
form button:hover{
  background: #219150;
}
That’s all, now you’ve successfully created an input field that checks Email Validation in HTML CSS & JavaScript. If your code doesn’t work or you’ve faced any error/problem then please comment down or contact us from the contact page.
If you have already created a login form then you can use these validation codes to validate your email address or if you have basic knowledge of JavaScript then you can do password validation, username validation, and many more using this email validation concept.


