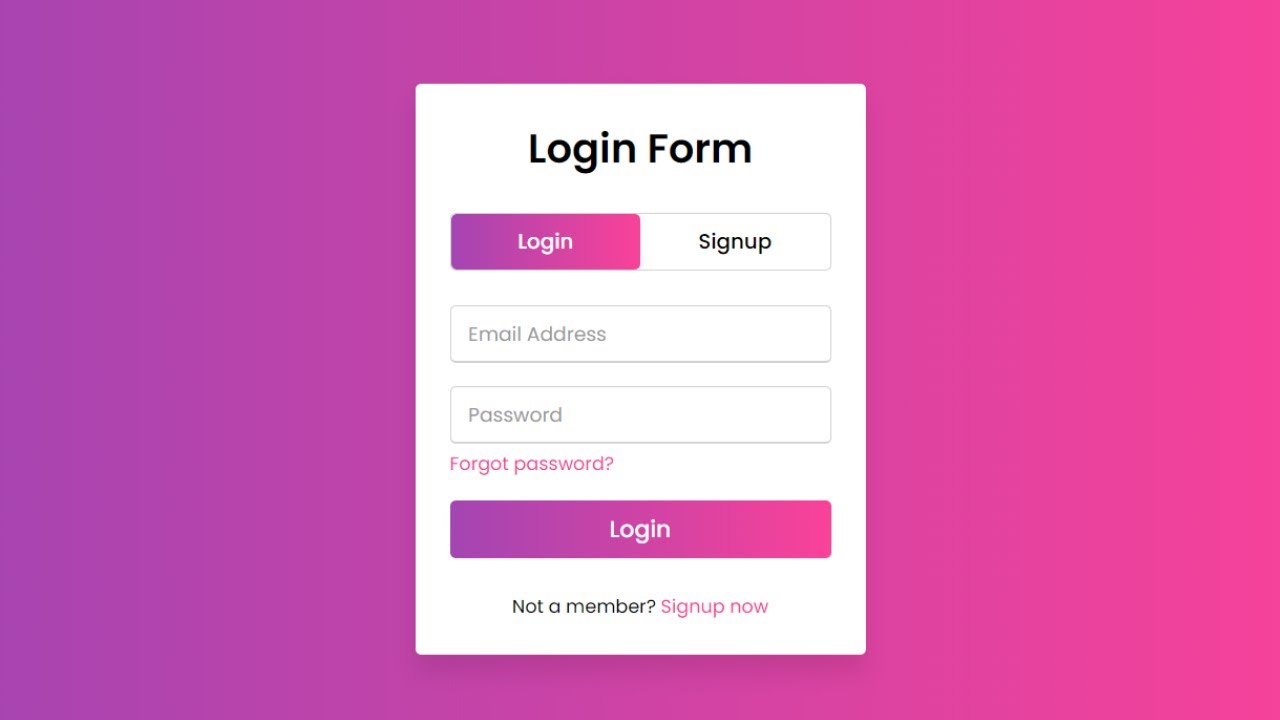
Hey friends, today in this blog, you’ll learn how to create an Animated Login and Registration Form in HTML CSS & JavaScript. Earlier I shared many blogs on How to Create a Login Form using HTML & CSS but, I haven’t shared a particular blog related to Login and Registration Forms in HTML. So, it’s time to create this one.
In this Form (Login and Registration Form in HTML), on the webpage, there is a login form and two toggle buttons at the top of the form labeled Login and Signup as you can see in the preview image above.
When you click on the signup button, the login form smoothly slides from the right to the left side and shows you the signup form.
And again after clicking the login button, the signup form slide from the left to the right side and shows you the login form. In this form, the login and signup forms both are on the same page and it is done with a little bit of JavaScript codes.
If you’re feeling difficult to understand what I am saying, you can watch a full video tutorial of this form (Login and Registration Form in HTML).
Video Tutorial of Login and Registration Form in HTML
In the video, you have seen an animated Login and Registration Form that is created using HTML CSS & JavaScript. I hope you’ve understood the basic codes behind creating this form.
I used just a few lines of JavaScript codes to complete this form, so you can easily create this type of login and registration form in HTML even if you’re a beginner.
JavaScript is used only to slide the form on button click and the toggle tab that slides from login to signup text and signup to login text is wholly based on pure HTML & CSS with the help of HTML <input type=”radio”> tag.
If you liked this login form and want to get source codes or files, you can get them from the bottom of this page.
You might like this:
Login and Registration Form in HTML [Source Codes]
To create this form (Login and Registration Form in HTML). First, you need to create two Files one HTML File and another one is CSS File. After completing these files paste the following codes into your file.
First, create an HTML file with the name index.html and paste the given codes into your HTML file. Remember, you’ve to create a file with a .html extension.
<!DOCTYPE html>
<!-- Created By CodingNepal -->
<html lang="en" dir="ltr">
   <head>
      <meta charset="utf-8">
      <title>Login and Registration Form in HTML | CodingNepal</title>
      <link rel="stylesheet" href="style.css">
      <meta name="viewport" content="width=device-width, initial-scale=1.0">
   </head>
   <body>
      <div class="wrapper">
         <div class="title-text">
            <div class="title login">
               Login Form
            </div>
            <div class="title signup">
               Signup Form
            </div>
         </div>
         <div class="form-container">
            <div class="slide-controls">
               <input type="radio" name="slide" id="login" checked>
               <input type="radio" name="slide" id="signup">
               <label for="login" class="slide login">Login</label>
               <label for="signup" class="slide signup">Signup</label>
               <div class="slider-tab"></div>
            </div>
            <div class="form-inner">
               <form action="#" class="login">
                  <div class="field">
                     <input type="text" placeholder="Email Address" required>
                  </div>
                  <div class="field">
                     <input type="password" placeholder="Password" required>
                  </div>
                  <div class="pass-link">
                     <a href="#">Forgot password?</a>
                  </div>
                  <div class="field btn">
                     <div class="btn-layer"></div>
                     <input type="submit" value="Login">
                  </div>
                  <div class="signup-link">
                     Not a member? <a href="">Signup now</a>
                  </div>
               </form>
               <form action="#" class="signup">
                  <div class="field">
                     <input type="text" placeholder="Email Address" required>
                  </div>
                  <div class="field">
                     <input type="password" placeholder="Password" required>
                  </div>
                  <div class="field">
                     <input type="password" placeholder="Confirm password" required>
                  </div>
                  <div class="field btn">
                     <div class="btn-layer"></div>
                     <input type="submit" value="Signup">
                  </div>
               </form>
            </div>
         </div>
      </div>
      <script>
         const loginText = document.querySelector(".title-text .login");
         const loginForm = document.querySelector("form.login");
         const loginBtn = document.querySelector("label.login");
         const signupBtn = document.querySelector("label.signup");
         const signupLink = document.querySelector("form .signup-link a");
         signupBtn.onclick = (()=>{
           loginForm.style.marginLeft = "-50%";
           loginText.style.marginLeft = "-50%";
         });
         loginBtn.onclick = (()=>{
           loginForm.style.marginLeft = "0%";
           loginText.style.marginLeft = "0%";
         });
         signupLink.onclick = (()=>{
           signupBtn.click();
           return false;
         });
      </script>
   </body>
</html>
Second, create a CSS file with the name style.css and paste the given codes into your CSS file. Remember, you’ve to create a file with a .css extension.
@import url('https://fonts.googleapis.com/css?family=Poppins:400,500,600,700&display=swap');
*{
  margin: 0;
  padding: 0;
  box-sizing: border-box;
  font-family: 'Poppins', sans-serif;
}
html,body{
  display: grid;
  height: 100%;
  width: 100%;
  place-items: center;
  background: -webkit-linear-gradient(left, #a445b2, #fa4299);
}
::selection{
  background: #fa4299;
  color: #fff;
}
.wrapper{
  overflow: hidden;
  max-width: 390px;
  background: #fff;
  padding: 30px;
  border-radius: 5px;
  box-shadow: 0px 15px 20px rgba(0,0,0,0.1);
}
.wrapper .title-text{
  display: flex;
  width: 200%;
}
.wrapper .title{
  width: 50%;
  font-size: 35px;
  font-weight: 600;
  text-align: center;
  transition: all 0.6s cubic-bezier(0.68,-0.55,0.265,1.55);
}
.wrapper .slide-controls{
  position: relative;
  display: flex;
  height: 50px;
  width: 100%;
  overflow: hidden;
  margin: 30px 0 10px 0;
  justify-content: space-between;
  border: 1px solid lightgrey;
  border-radius: 5px;
}
.slide-controls .slide{
  height: 100%;
  width: 100%;
  color: #fff;
  font-size: 18px;
  font-weight: 500;
  text-align: center;
  line-height: 48px;
  cursor: pointer;
  z-index: 1;
  transition: all 0.6s ease;
}
.slide-controls label.signup{
  color: #000;
}
.slide-controls .slider-tab{
  position: absolute;
  height: 100%;
  width: 50%;
  left: 0;
  z-index: 0;
  border-radius: 5px;
  background: -webkit-linear-gradient(left, #a445b2, #fa4299);
  transition: all 0.6s cubic-bezier(0.68,-0.55,0.265,1.55);
}
input[type="radio"]{
  display: none;
}
#signup:checked ~ .slider-tab{
  left: 50%;
}
#signup:checked ~ label.signup{
  color: #fff;
  cursor: default;
  user-select: none;
}
#signup:checked ~ label.login{
  color: #000;
}
#login:checked ~ label.signup{
  color: #000;
}
#login:checked ~ label.login{
  cursor: default;
  user-select: none;
}
.wrapper .form-container{
  width: 100%;
  overflow: hidden;
}
.form-container .form-inner{
  display: flex;
  width: 200%;
}
.form-container .form-inner form{
  width: 50%;
  transition: all 0.6s cubic-bezier(0.68,-0.55,0.265,1.55);
}
.form-inner form .field{
  height: 50px;
  width: 100%;
  margin-top: 20px;
}
.form-inner form .field input{
  height: 100%;
  width: 100%;
  outline: none;
  padding-left: 15px;
  border-radius: 5px;
  border: 1px solid lightgrey;
  border-bottom-width: 2px;
  font-size: 17px;
  transition: all 0.3s ease;
}
.form-inner form .field input:focus{
  border-color: #fc83bb;
  /* box-shadow: inset 0 0 3px #fb6aae; */
}
.form-inner form .field input::placeholder{
  color: #999;
  transition: all 0.3s ease;
}
form .field input:focus::placeholder{
  color: #b3b3b3;
}
.form-inner form .pass-link{
  margin-top: 5px;
}
.form-inner form .signup-link{
  text-align: center;
  margin-top: 30px;
}
.form-inner form .pass-link a,
.form-inner form .signup-link a{
  color: #fa4299;
  text-decoration: none;
}
.form-inner form .pass-link a:hover,
.form-inner form .signup-link a:hover{
  text-decoration: underline;
}
form .btn{
  height: 50px;
  width: 100%;
  border-radius: 5px;
  position: relative;
  overflow: hidden;
}
form .btn .btn-layer{
  height: 100%;
  width: 300%;
  position: absolute;
  left: -100%;
  background: -webkit-linear-gradient(right, #a445b2, #fa4299, #a445b2, #fa4299);
  border-radius: 5px;
  transition: all 0.4s ease;;
}
form .btn:hover .btn-layer{
  left: 0;
}
form .btn input[type="submit"]{
  height: 100%;
  width: 100%;
  z-index: 1;
  position: relative;
  background: none;
  border: none;
  color: #fff;
  padding-left: 0;
  border-radius: 5px;
  font-size: 20px;
  font-weight: 500;
  cursor: pointer;
}
That’s all, now you’ve successfully created a Login and Registration Form in HTML CSS & JavaScript. If your code doesn’t work or you’ve faced any error/problem then please download the source code files from the given download button. It’s free and a .zip file will be downloaded then you’ve to extract it.


